If you have a sizable collection of DVDs and Blu-ray discs gathering dust, you might want to consider digitizing those bad boys so you can watch them on your phone, computer, or tablet anywhere, anytime. (And owning a backup means you won’t have to to worry about how to fix a scratched DVD or CD.) The process isn’t complicated if you’re comfortable with some basic software, but we’ll guide you through the process, just to make it as simple as possible.
Technically, if the work is copyright protected, it’s illegal to do so, even if you own it. To be clear, we do not condone or encourage the unlawful ripping and/or reproduction of copyrighted materials. That said, if you’ve got home videos (or, really, anything that’s not copyrighted), you’re free to do whatever you want with them, and that includes digitizing them.
What you need
Some of this may seem obvious, but it’s important to list out everything you’ll need:
- Your DVD or Blu-ray(s)
- A DVD or Blu-ray disc drive on your computer — you won’t be ripping anything without one. If your computer lacks the proper disc drive, an external DVD or Blu-ray drive can be purchased for as little as $25.
- Enough storage on a hard drive to save the ripped files. A Blu-ray will make a huge file, so we recommend you have between 30 to 60 GB of free hard drive space if you’re looking to rip one
- A program to rip the files. We’ll be using MakeMKV in this guide, which is available for both PC and Mac.
- A program to transcode the file after its ripped. We recommend Handbrake, which is also both PC and Mac supported.
- A VLC media player to watch your video
- Once you’ve got all of the necessary materials, it’s time to get a-rippin’.
How to rip with MakeMKV
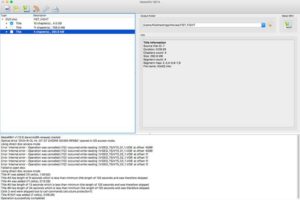
Whether you’re using a PC or Mac, or ripping a Blu-ray or a DVD, this process is identical for all of them. First, download and install MakeMKV, and open the application once completed. The app will say “MakeMKV BETA” at the top — ignore this, and insert your DVD or Blu-ray into the drive. Once the program recognizes your disc, click the big disc drive icon to begin. Theoretically, this process could also remove copyright protections from a disc, but again, that’s not something we condone or encourage.

After you’ve selected your disc, MakeMKV will return a list of chapters and segments that you can rip. To rip only the movie itself, and not extras or bonus material, select only the movie chapter or segment (usually the longest title or biggest file) and uncheck all the other boxes. Next, designate an Output Folder where you’d like the file to end up once it’s been ripped. When you’re all ready to go, hit the “Make MKV” button on the right. This process can take anywhere from two minutes to half an hour depending on your computer’s specs and the size of the file, but when it’s done, you should have a nice big MKV file waiting in the specified folder.
In some cases, you don’t even need to convert this file, as MKV files are compatible with the desktop and mobile versions of VLC, as well as Plex’s media server. If those are your primary methods for watching videos from your library, you can stop here. Still, it may be advisable to convert these files to save space; Blu-ray files in particular tend to be massive. That’s why you’ll want to employ a transcoding program — to minimize file size and/or play the file on multiple devices.
Also, before transcoding, it’s a good idea to make sure your video looks OK — use VLC (if you don’t have it, get it here for free) to play the file.
How to transcode with Handbrake
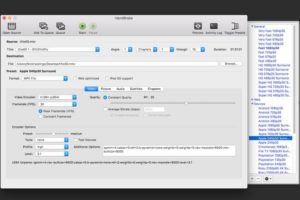
After ripping, you’ll have a big file that needs to be transcoded for use on different devices. Install and open HandBrake (which you can get here for free), click on Source in the top left corner, and find the file you just ripped.
Now you get to decide where you want to watch your video. The app’s developers have already created presets for lots of products; there are a few different options for Apple and Android devices, as well as PlayStation and Xbox gaming consoles and several streaming devices. You can also modify any of these presets and save them with new names or create custom presets from scratch. Selecting one of these presets will automatically adjust all the settings to fit whatever you choose.

You can also use HandBrake to resize files; for instance, if you’ve got a huge MKV file, you can choose a preset under the “Matroska” subset (MKV stands for Matroska Video) and run the program to shrink that file down.
If you’re transcoding a Blu-ray disc, the process works the same way, but you’ll want to select different settings to avoid unnecessary compression and to preserve the video quality. For DVDs, there’s no reason to select a resolution above 480p; this will just increase file size without boosting quality. For Blu-ray discs, you’ll want to choose between 720p and 1080p — to save space, we recommend selecting 720p for anything that isn’t necessary in full HD. For videos with more visual substance, it’s probably worth choosing 1080p.
Generally speaking, the “High Profile” preset — located in the Legacy subset — is a good place to start, with Passthrough audio codecs selected (pick an HD audio option for lossless, if that’s your bag) and a Constant Quality value of RF 18 or so; this is mostly personal preference, so you should experiment to find out what works best.
Choose a file destination, play around with the options until you’ve got everything just right, then go ahead and click Start. This part will take a while, so sit back, relax, and let HandBrake do its thing. Once the process is complete, you’ll have a shiny new file ready for playback on your chosen device. This process is repeatable, too; if you have several different devices, you can simply change presets and run the program for the same DVD or Blu-Ray again (as long as you’ve selected a new destination to avoid overwriting the previous result).
That’s it! You’ve successfully ripped and transcoded a DVD or Blu-ray disc.


